|
|
Ohhh... It's so easy--and I was making it so hard!
Over a year ago I began trying to work out a cheap and easy way to scan 35 mm slides on an ordinary flatbed scanner--to avoid buying the Transparent Media Adapter for several hundred dollars.
This is the third--and, I think, the final--stage in figuring out how to do the same job for free. (If you're curious, links to my two previous methods are on the Scanning Experiments page.)
(Oops! This just in: Using a Fluorescent Flashlight to Scan Slides on a Flatbed Scanner. This method also works, but you have to have the fluorescent flashlight.)As I said, it's so simple! At an educational conference yesterday (20 May 1999) I happened to spot an odd little triangular gizmo sitting on the glass of a scanner. It turned out to be an HP scanner, and the triangular gizmo was HP's own TMA adapter.
I picked it up and looked underneath, expecting to find evidence of electo-optical wizardry in there.
WOW--it was completely empty--just a right-isosceles-triangular plastic box, open on the hypotenuse side, with two bits of shiny sheet tin-can metal lining the two other sides. That's all! I got a guy to demonstrate it. He laid the box hypotenuse down, in one corner of the scanner's glass, so that it lay across the glass, covering about three-fifths of the width. Then he slid a 35 mm slide under the end of the gizmo closest to the center of the glass. He did a quick preview, selected the transparent portion of the slide, and scanned it. And there it was--a perfectly beautiful image appeared. (Digress to the Hewlett-Packard patent--opens in its own window--and find out how and why it works.)
Naturally I had to try this for myself. I left the conference early and drove straight home. Grabbed a sheet of aluminum foil and fashioned a triangular box of it. Scanned--and the image was plenty clear and bright, but the crinkles in the foil were visible through the slide's image. Considered cutting up a tin can, but couldn't find an empty one. Hmmm... what else might work? What about plain white paper? Well, let's find out. I grabbed a sheet of extra-white ink-jet printer paper, a ruler, and a pencil.
Okay, okay, I'll spare you the rest of the story: it works great. For convenience, I'll call it a--
BackLighter
Here's how to make one for yourself in a few minutes.
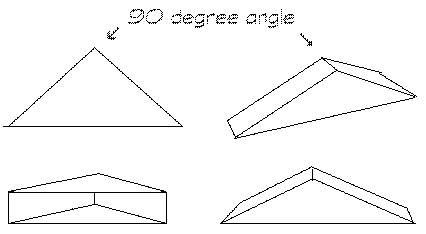
You'll end up with a shape like what you'd get if you had taken a square box, four inches on a side and two inches thick, and cut it in half diagonally. It'll have two triangular sides, and with the "angle" up, it will be open on the bottom.
Here's a full-size template to print on 8.5" x 11" paper. (Opens in a new window.) If you print from your web browser, first change the page settings to 0 margins all around and turn off all headers and footers. It should work with US letter and A4 paper.
The dimensions aren't critical at all, but I think you want the triangular surfaces to have a right angle and equal adjacent sides. Print out the template above. Or draw the lines on a sheet of paper. Then cut on the solid lines and fold on the broken lines. All folds are upward--"toward" you--or "in." Crease the folds with a fingernail to make them sharp and smooth. Overlap the triangles on each side and tape, glue, or staple them together. You're done!
 Here's
how it should look when you get it folded and taped:
It's important to use the whitest, brightest paper you can find. This is to get the most light behind (above) the slide, with the least color change. I used a sheet of "Hewlett Packard Bright White Inkjet Paper." It's a lot whiter and smoother than ordinary printer or Xerox paper. I bought a ream at the local office supply store.
What doesn't work is mirrored surfaces. If you use a mirror above the slide or--two mirrors at right angles to each other, like a tent--instead of paper, the scanner will see itself through the slide. The HP gizmo uses shiny, tinned sheet metal, which reflects a lot of light, but which also diffuses the light. The paper probably reflects somewhat less light, but diffuses even better than the metal does.
But why not make a BackLighter out of shiny tin can metal, like HP's gizmo? Well, you can--but first read HP's patent (opens in its own window) to find out about the critical angles they had to use because the scanner's lamp and sensor are in different planes. I think you'll probably find that paper works well enough.
And here's the result--scanned here at only 150 dpi.:

How did I get that image? There are a few easy software tricks involved, explained on the next page, (opens in a new window) along with some pictures showing how to place slides and the BackLighter on the scanner.
Postscript: Bob Warsham wrote in that he made a BackLighter out of foam core art board, instead of paper. This stuff is a sandwich of styrofoam between two layers of posterboard and is available in office supply stores. It's light, rigid, and easy to work with--terrific for projects like this. If you use it, lay out the dimensions as above, but eliminate two of the triangular sections, one from the top of the drawing above and one from the bottom. (In other words, make half of each horizontal fold line into a cut.) To do the folds, use a knife or razor blade to cut through one layer of the posterboard and the foam core, but not through the second layer of posterboard. Fold toward the uncut side and tape the joints. Bob said he lined the inside with silver mylar, but I found that plain white foam core art board alone worked just fine.
Don Maxwell

(Please type it into the "To:" box in an email message.)